8.17.2011

best-laid plans

The post-junk-removal planning period has required a lot of thinking and not a lot of doing. Nevertheless, there has been some progress: we have chosen a loose design, worked out some construction issues, and decided on a plan of action. Last weekend, we went to the Home Depot to check out decking materials - more on that later.

Tonight, I donned an old hat and toyed around in Photoshop. You see, I was an architecture student once upon a time. Those three semesters were pretty hellish, but I emerged with a working knowledge of the Adobe Suite and a couple rendering programs. What I threw together in the last 30 minutes is a testament to how much concern for detail I have lost in the past six years - and the fact that I had a very important beer softball event to attend earlier tonight. In fact, it is one of the silliest planning diagrams I have ever put together. Scale? Psh. Perspective? Optional. And you know what? I don't care. My days of torturous image manipulation are over.* These days, I aim for interpretative. Oh, but magnetic lasso? Still gives me major eyelid twitch.

So, here is what my backyard looked like yesterday afternoon.


You think it looks messy now, but consider yourself lucky that I didn't think to take a photograph from this angle before the junk men came. Somehow, we are still using the grill(s) and my housemate and some friends even managed to dine out there a few nights ago. At least I know the space will be used when all this is said and done.

And, here is what the plan is (click to enlarge - my layout won't allow anything bigger):


The green will be 12" raised beds, built with (hopefully cedar) 2"x4"s and topped with something wide enough to serve as a bench for entertaining and/or weeding. The brown will be decking, elevated 6-8" above the level of the existing dirt.

Originally, I had wanted to install raised beds in a U-shape covering three sides of the yard space. However, the yard is just under 14'x14', and I think that might be too much usable space gone. Dropping the beds from the left side of the photo will improve the movement flow, give us a little extra space, and allow for better flexibility in terms of where everything goes. At the moment, we will have a big grill, a big-ass rain barrel, a cafe table or two, chairs, and a number of potted plants to deal with.

As the construction gets going, I am sure there will be adjustments to this setup. Much of what we construct over the next few weeks will be determined by how usable the existing structural grid proves to be.

Anyway, coming up in the next post: ivy! Wha-at is it good for? Absolutely nothing!

----------

*At least until the next time I decide to write an image-based research paper and try to format it in Microsoft Word. Shoot me.

7.27.2011

a few thoughts on junk removal

I learned some things about junk removal over the past few days. A cursory internet search was less than helpful*, so here is my rundown. Should you ever need to remove junk that the fine people of Craigslist don't even want, read on (if you don't, this may be a pretty dry post):

7.26.2011

of junk and hauling

At long last, some progress!

I can't believe it has taken four months to rip everything up in the back yard. Admittedly, I haven't been working on it every weekend. More like an hour or two here and there. A nasty summer cold, the heat, and general laziness have also slowed down the process.

A few weeks ago, I came to the realization that I was spending the majority of my time moving trash, planters, and deck furniture around to be able to access whatever it was I needed to work on, rather than doing the actual construction work itself. It was time to haul some junk.

Disposal of said junk, however, is more complicated than it would seem. After sorting through the plastic bags, junk food wrappers, bottles, cans, the occasional piece of flatware, and glass, and sending it on its way in the normal trash and recycling, I was left with a lot of construction debris: chunks of plywood, broken-up bricks, and a host of random metal scraps, mortar, and rocks that we found under the original deck.

Like many cities, Philadelphia does not allow residents to throw away construction debris in regular trash pickup. For good reason, too. Construction materials are bulky, heavy, and sometimes more dangerous than normal household trash. And I can only imagine what trash day would look like in this city if we were all allowed to toss our rebar, drywall, and mortar chunks onto the street.

My options for dealing with the rest of the junk were as follows:
  • Build over the trash. I mean, that's what the last guys did (ugh). Cost: free, a guilty conscience, and some pretty questionable stuff in the soil below my raised beds.
  • Take the debris to the dump myself. Cost: $80-$100 for up to one ton of debris drop-off, $50 pickup truck rental for a half day, manpower + sweat.
  • Pay someone to take the trash. Cost: $350, peace of mind that the junk gets taken to the proper facilities (and not tossed in the Schuylkill), a few glasses of water/lemonade/tea for the crew.
After a couple of weeks of dragging my feet, Option 3 was looking better and better. $350 is a lot of money, especially given my budget of about $2000 for this whole project. But I've only given myself until Labor Day to finish the project, and that deadline is rapidly approaching. Today I bit the bullet and hired Junk-Be-Gone (full review to follow).

It was a very good decision.

It took less than an hour for two guys to clear everything out, and they did a great job. I didn't have to lift a finger in the 90+ degree heat, either. And, of course, the best part: the yard is finally clean enough that I can move on to the building phase.

Stay tuned for posts about raised flower beds, decking materials, rain collection barrels, and much more!

5.03.2011

Welp.

Update:
The backyard project got sidelined while I finish out the semester. In the meantime, please enjoy this photograph of delicious-looking sun-brewed iced tea.
Love, Sarah

3.13.2011

Starting Fresh

Well, friends, it seems as though I failed at keeping this blog going last summer. Typically, I neglect/abandon a blog for a whole host of reasons, but this time I have a good excuse. You see, at some point last summer I decided to buy a house. After a grueling real estate process, by August I ended up with some pretty sweet digs on Federal Street in South Philadelphia. Amid the chaos of moving, I lost sight of the gardening project and this blog. Sure, (most of) the containers made it to the new house, but the end-of-summer harvest never really happened.

The new house is a great find. It's a big, rehabbed row home on a great block of a so-so neighborhood. We purchased it from a developer who gutted the place and started from scratch. The end result is gorgeous, although the longer we live here, the more we notice how many corners were cut in the renovation process. The most glaringly half-assed job? The back yard.

Yuck.
Here you see a deck in typical post-winter mess mode. At this point, you may be wondering, "what is that surface?" Well, it's three inches of weather-treated plywood. I kid you not. It isn't level, it isn't permeable, and it sure is ugly. See the standing water there? That's Lake Federal, breeder of mosquitoes, collector of scum, and general bane of my existence.

Moving into the house, I knew the back yard had huge potential. It's about 14' x 14' and it gets decent light. What I could not have predicted was how much water would collect, and how unpleasant it would be to use the space. Never mind the fly infestation and the neighborhood cats who used the planters as litter boxes. Something had to be done, but the project got shelved until the springtime.

Until today, I had no idea what was underneath the plywood. Dead bodies, trash, pirate's booty?Sometime last fall, in a fit of frustration, I drilled some holes to help with the drainage. They plugged up with sawdust.  All I knew was that it was a pretty thick layer of wood.

Roommate Nate, a fellow gardener whom you will meet soon, and I have been brainstorming off and on all winter about plans, but the unknown under-layer kept us from thinking too much about it. Ideally, we would like some combination of raised beds and containers, with enough surface to accommodate two gas grills and some seating. It would also be great if we could disguise the wall surfaces surrounding the area (dirty stucco, white aluminum fencing, random vertical plywood and a cinderblock wall).

So I asked for power tools for Christmas. My specific needs included a reciprocating saw, which is the scariest, most awesome power tool I've ever used. Anything that takes a variety of blades called "demolition" is pretty rad, I think. So I demolitioned.

Safety first!
With Hank hanging out in the event I needed a trip to the emergency room, I picked a random spot and started to saw. Turns out there is a 4x4 bracing system under the plywood, and I picked the exact wrong spot to start sawing. I didn't take any pictures, but the Sawsall got three-quarters of the way through the beam, explaining why it took so much work to cut that first chunk out.

Surprise of all surprises, the plywood surface was covering up a lot of trash. Plastic bags, broken up brick, water bottles, glass chunks, centipedes, ceramics (do I look like an archeologist?). I might have to start a collection of the weird odds and ends I find, but that's a project for another time.

The work is slow-going. The saw is powerful, but it still takes a good amount of strength and patience to cut through this stuff. I spent another hour or so tearing up some big pieces, and then called it a day. Tomorrow will likely bring the first sore back out of many, many to come. But, as Hank put it, whenever I'm frustrated with grad school, I can always go out back and tear some crap up.

End of Day 1
I'm the best at making mess.
Today I only managed a 6-foot hole. However, the best news is this: there's dirt! Lots of dirt! Maybe 10" or so of dirt! This bodes very well for raised beds, assuming the dirt extends from wall to wall. Dirt also means that drainage may not be as big of a problem. Fingers crossed on that one.

------

So, my dear readers. This blog is about to take a change of direction. In the interest of keeping this project down to a timeline of only one season, I am forfeiting actual gardening for this year. However, hopefully the end result yields a really beautiful, productive garden for years to come. And no more Lake Federal.

In the mean time, check in for updates on the process. Once the actual demolition is done, I am looking forward to getting back to my undergrad roots and using an excessive number of illustrations, plans, and elevations to do this thing right. Good gardening comes from good design.

Welcome to the next chapter of The City Garden.

6.27.2010

worm tea

There's a lot going on in the garden these days. I've got flowers and fruits and a whole bunch of containers that are loving this heat wave!

But first, an update on the insecticidification. So far, I have been pleased with Safer's insecticide spray. It smells a little funky; I imagine that's the anti-fungal sulfur doing its thing. All in all, I think it really took care of the aphid problem. I still see some leafhoppers here and there, but I'm not sure I can really prevent that, seeing as their modus operandi is hopping from leaf to leaf (and away from the poison). The only negative I've found with Safer's is that it sometimes leaves a film of dusty whiteness on the leaves. Such a thing is usually indicative of some kind of plant disease, mold, mildew, etc., but I don't see any other indication of sickness, and the spray should be doing something to prevent at least a few of those things. In any event, I have seen no decline in overall plant health.

In other news, the vegetables are coming along nicely, although I have yet to harvest any actual food. The zucchini plants have been blossoming at an incredible rate, and I have been experimenting with blossom fritters (delicious!), but that's all the food we have gotten from the deck as of yet. However, this is about to change. The pepper plant has peppers (they just haven't turned orange yet), the bush beans have baby beans that will be big enough to eat soon, the zucchini is at least trying to get fruit started, and best of all, my tomatoes are coming in! See that photo up there? That, my friend, is a cherry tomato, and I am thrilled!

Given that just about everything is at least blossoming, it's high time I re-fertilized. Fortunately, a friend of mine was looking to get rid of a hefty load of worm tea from her house's worm bin. Worm tea, for the uninitiated, is basically the liquid runoff found at the bottom of a multi-tiered worm bin. Water, steeped in all the delicious nutrients found in vermicompost substrate, makes its way down to the bottom of the bin, where a tap is typically used to dispense it for use. It yields a murky liquid that smells, for lack of a better term, earthy.  Worm tea is a great natural fertilizer that basically takes all the nutrients found in worm castings (a.k.a. plant food) and condenses it into a liquid form.

You may be wondering why I needed to get my tea from a friend. Very simply, my worm bin does not have a standing layer of sludge or liquid. Perhaps because it is still in the establishing phases, I don't have very much substrate. Furthermore, my bin is a one-level set up, meaning that there is no extra reservoir for liquid, or a good way to harvest it even if there were.

This afternoon, I used about 250ml (~1 cup) of tea, diluted in about 2L of water. The Interwebs (here, here, and here) seem to be in some disagreement about how diluted the tea should be, but at a 1:8 ratio, I figured I was in the ballpark. After giving each of my veggie and herb plants a shot of diluted tea, I followed it up with a normal watering, just to make sure that a) the tea wasn't too concentrated, which would result in sadness for the plants, and b) that the nutrients made it deep down into the soil.

My hope is that by fertilizing, I will be giving the garden a boost to keep it going through its producing stage. I still have 3-4 more applications of tea left, but I think I will wait a week or so and see how the plants are doing before applying again. For the rest of the summer, it will be a good idea to continue fertilizing at regular intervals, at least until the plants cease to bear fruit.

6.12.2010

aphids!

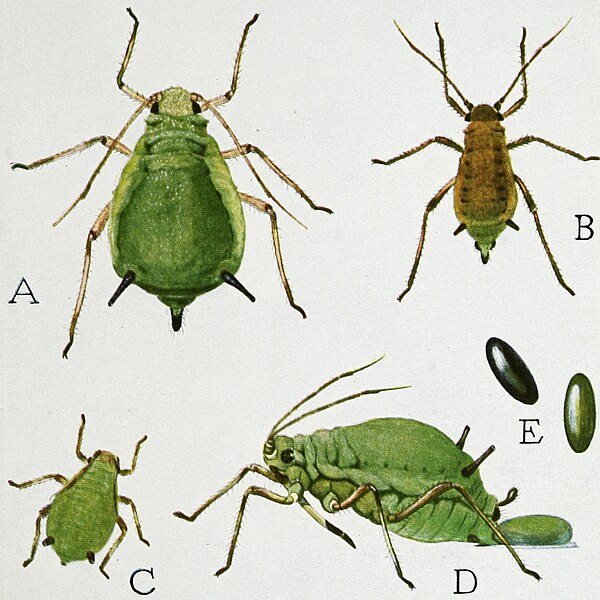
One of the many benefits of container gardening is that your precious plants are less subject to the pests and diseases that often plague ground gardeners. Soil-born diseases are nil, as most potting soils are sterilized. Likewise, being up off the ground has its advantages: whatever insects are creeping around in your yard dirt probably have a hard time climbing up into your pots. There are, however, exceptions, and one of the most common and most obnoxious is the aphid.
Turns out I have been harboring these monsters. Aphids basically suck leaves and stems dry, and they reproduce very quickly, leaving you with an infestation in no time. I hadn't been looking for bugs, but when my eggplant plants continued to look sad and stunted, I realized I needed to be checking for pests. Sure enough, the underside of the leaves revealed these little buggers, and I promptly took action.

With aphids, you can usually start by blasting them off the leaves and stems of plants with a strong spray from your garden hose. Unfortunately, my watering can can't quite muster the water pressure, and it certainly cannot wash the undersides of leaves thoroughly. On to Option B.

I started by looking up some homemade insecticide sprays online. Aphids are soft-bodied, so they are pretty weak against oils, soaps, spiciness, and a whole litany of other things. The trick, however, is to avoid killing your plants in the process of killing your pests. You can find recipes all over the interwebs (here and here and here), and a former neighbor and gardener extraordinaire passed on her recipe as well. I hodgepodged together a mix of garlic, onion, hot and red pepper, chili powder, and ginger, boiled it down, strained it, cooled it, added a tiny bit of dish soap, and then loaded it up into a generic spray bottle. A healthy initial dose on the eggplants seemed to kill and/or wash away the visible aphids, and left my garden smelling like a wacky chili.

But then the aphids were back two days later. And I noticed that they had also taken up residence on my zucchinis. (Later I realized that the ants that had been crawling all over the zucchinis were actually attracted to sticky sweet aphid byproduct, and I should have seen it as a warning sign...) I sprayed with the spicy mixture again, this time all over the garden. But then the aphids came back. Obviously, this meant war.

After a little bit of internet research and consulting with the friendly employees at the neighborhood organic home-goods store and a gardening shop, the next step up are insecticidal soap sprays. Made of fatty acids, essential oils, and sometimes anti-fungal agents like sulfur, insecticidal soaps are still organic, and theoretically safe to use around children and animals, but definitely more harsh than anything you can make on your stove top.

Today I picked up Safer Brand 3-in-1 Garden Spray at my local hardware store. It includes treatment for mites and fungus as well as insects. The hardware store also carried Garden Safe brand, which was only for insects, but the Safer was a little cheaper, and I figured I could stand to prevent a mite or fungus infestation while I'm at it.

The directions instruct you not to use the spray in bright sunlight or high heat (both of which we have today), so I will wait until this evening to spray.

This is serious war. Hopefully I'll have good news in a few days.