6.27.2010

worm tea

There's a lot going on in the garden these days. I've got flowers and fruits and a whole bunch of containers that are loving this heat wave!

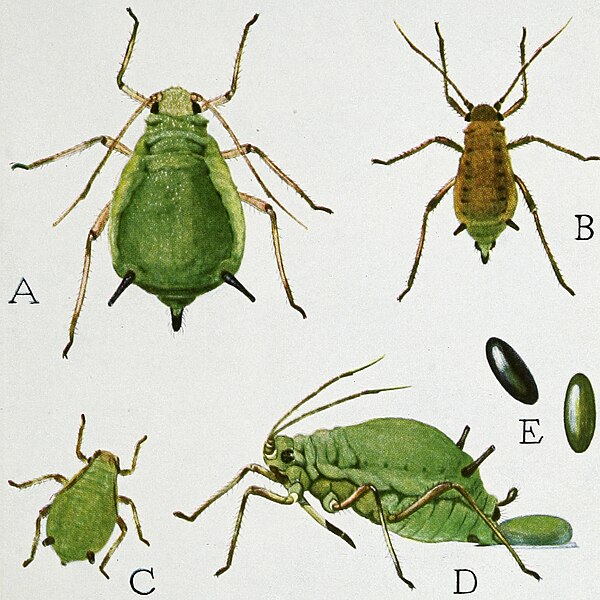
But first, an update on the insecticidification. So far, I have been pleased with Safer's insecticide spray. It smells a little funky; I imagine that's the anti-fungal sulfur doing its thing. All in all, I think it really took care of the aphid problem. I still see some leafhoppers here and there, but I'm not sure I can really prevent that, seeing as their modus operandi is hopping from leaf to leaf (and away from the poison). The only negative I've found with Safer's is that it sometimes leaves a film of dusty whiteness on the leaves. Such a thing is usually indicative of some kind of plant disease, mold, mildew, etc., but I don't see any other indication of sickness, and the spray should be doing something to prevent at least a few of those things. In any event, I have seen no decline in overall plant health.

In other news, the vegetables are coming along nicely, although I have yet to harvest any actual food. The zucchini plants have been blossoming at an incredible rate, and I have been experimenting with blossom fritters (delicious!), but that's all the food we have gotten from the deck as of yet. However, this is about to change. The pepper plant has peppers (they just haven't turned orange yet), the bush beans have baby beans that will be big enough to eat soon, the zucchini is at least trying to get fruit started, and best of all, my tomatoes are coming in! See that photo up there? That, my friend, is a cherry tomato, and I am thrilled!

Given that just about everything is at least blossoming, it's high time I re-fertilized. Fortunately, a friend of mine was looking to get rid of a hefty load of worm tea from her house's worm bin. Worm tea, for the uninitiated, is basically the liquid runoff found at the bottom of a multi-tiered worm bin. Water, steeped in all the delicious nutrients found in vermicompost substrate, makes its way down to the bottom of the bin, where a tap is typically used to dispense it for use. It yields a murky liquid that smells, for lack of a better term, earthy.  Worm tea is a great natural fertilizer that basically takes all the nutrients found in worm castings (a.k.a. plant food) and condenses it into a liquid form.

You may be wondering why I needed to get my tea from a friend. Very simply, my worm bin does not have a standing layer of sludge or liquid. Perhaps because it is still in the establishing phases, I don't have very much substrate. Furthermore, my bin is a one-level set up, meaning that there is no extra reservoir for liquid, or a good way to harvest it even if there were.

This afternoon, I used about 250ml (~1 cup) of tea, diluted in about 2L of water. The Interwebs (here, here, and here) seem to be in some disagreement about how diluted the tea should be, but at a 1:8 ratio, I figured I was in the ballpark. After giving each of my veggie and herb plants a shot of diluted tea, I followed it up with a normal watering, just to make sure that a) the tea wasn't too concentrated, which would result in sadness for the plants, and b) that the nutrients made it deep down into the soil.

My hope is that by fertilizing, I will be giving the garden a boost to keep it going through its producing stage. I still have 3-4 more applications of tea left, but I think I will wait a week or so and see how the plants are doing before applying again. For the rest of the summer, it will be a good idea to continue fertilizing at regular intervals, at least until the plants cease to bear fruit.

6.12.2010

aphids!

One of the many benefits of container gardening is that your precious plants are less subject to the pests and diseases that often plague ground gardeners. Soil-born diseases are nil, as most potting soils are sterilized. Likewise, being up off the ground has its advantages: whatever insects are creeping around in your yard dirt probably have a hard time climbing up into your pots. There are, however, exceptions, and one of the most common and most obnoxious is the aphid.
Turns out I have been harboring these monsters. Aphids basically suck leaves and stems dry, and they reproduce very quickly, leaving you with an infestation in no time. I hadn't been looking for bugs, but when my eggplant plants continued to look sad and stunted, I realized I needed to be checking for pests. Sure enough, the underside of the leaves revealed these little buggers, and I promptly took action.

With aphids, you can usually start by blasting them off the leaves and stems of plants with a strong spray from your garden hose. Unfortunately, my watering can can't quite muster the water pressure, and it certainly cannot wash the undersides of leaves thoroughly. On to Option B.

I started by looking up some homemade insecticide sprays online. Aphids are soft-bodied, so they are pretty weak against oils, soaps, spiciness, and a whole litany of other things. The trick, however, is to avoid killing your plants in the process of killing your pests. You can find recipes all over the interwebs (here and here and here), and a former neighbor and gardener extraordinaire passed on her recipe as well. I hodgepodged together a mix of garlic, onion, hot and red pepper, chili powder, and ginger, boiled it down, strained it, cooled it, added a tiny bit of dish soap, and then loaded it up into a generic spray bottle. A healthy initial dose on the eggplants seemed to kill and/or wash away the visible aphids, and left my garden smelling like a wacky chili.

But then the aphids were back two days later. And I noticed that they had also taken up residence on my zucchinis. (Later I realized that the ants that had been crawling all over the zucchinis were actually attracted to sticky sweet aphid byproduct, and I should have seen it as a warning sign...) I sprayed with the spicy mixture again, this time all over the garden. But then the aphids came back. Obviously, this meant war.

After a little bit of internet research and consulting with the friendly employees at the neighborhood organic home-goods store and a gardening shop, the next step up are insecticidal soap sprays. Made of fatty acids, essential oils, and sometimes anti-fungal agents like sulfur, insecticidal soaps are still organic, and theoretically safe to use around children and animals, but definitely more harsh than anything you can make on your stove top.

Today I picked up Safer Brand 3-in-1 Garden Spray at my local hardware store. It includes treatment for mites and fungus as well as insects. The hardware store also carried Garden Safe brand, which was only for insects, but the Safer was a little cheaper, and I figured I could stand to prevent a mite or fungus infestation while I'm at it.

The directions instruct you not to use the spray in bright sunlight or high heat (both of which we have today), so I will wait until this evening to spray.

This is serious war. Hopefully I'll have good news in a few days.

5.26.2010

veggie washes

One difference between CSA produce and grocery produce is that you can tell it came out of the ground. This is by no means a bad thing. In fact, I would rather see dirt on my produce and be reminded to wash it well, than to have creepy hidden bugs in my grocery broccoli that I can't see until I've cooked it (true story, totally traumatizing). Especially with lettuce, I have been pretty careful to wash it thoroughly (and judging by the amount of lettuce I've eaten in the past two weeks, I need a salad spinner like nobody's business).

But the question is: do I need to do more than just rinse? I have seen vegetable washes and sprays on the market, at places like Whole Foods and Trader Joe's. I imagine they are pretty safe, or at least they are marketed to combat the unsafe ills of non-organic produce. My CSA is organic, so I shouldn't have to worry too much about the nastier chemicals, but what things other than soil should I look out for? And are the spray washes the answer?

5.20.2010

more lettucing than a girl can handle

School's out, I survived, I have settled into summer, and I am loving it. Not only have I had more time to spend in the garden, I've had more time to be a foodie, as well. So, today's blog is going to be about food for a change.

First off, my CSA started last week. I forgot to take a photo of everything that came last Thursday, but it was a monster half-share. An entire grocery shopping bag full of leaf lettuce, as well as a head of romaine, a bunch of green onions, watercress, mushrooms, and probably some other stuff I am forgetting. This week's haul was equally impressive: lots of green onions, some sort of cress, turnips, kale, a head of red lettuce, and my purple broccoli! Oh, and a loaf of bread from Metropolitan, who so graciously serve as the CSA pick-up point.

My container of lettuce alone is making more than I normally eat in salads, so needless to say, I have an overabundance of lettuce in my life right now. I've been trying to make more frequent, bigger salads. It's kind of exhausting, but delicious nevertheless. When the new CSA delivery came today, the worms got a feast of last week's leftovers.

In any event, I am excited to see some new items this week. I have never really cooked with turnips, so that should be an adventure. The purple broccolis look adorable and delicious, too. I don't know that I've ever knowingly eaten cress, and it is a delightful flavor addition to salads. I can't quite pinpoint the taste. Peppery, maybe a little lemony? Whatever. I figure, the less dressing I have to put on a salad, the better, and cress certainly spices things up.

In other news, I think I maybe don't like chard.

I know, I know. It's been so exciting to grow in the garden, but I am struggling with what to do with it in the kitchen. Hank hasn't eaten any since the first time I made him try it (steamed, a little lemon), and I keep wanting to like it, but I don't. The best attempt was to steam it with a load of butter and salt (what isn't improved by that method?), but that was passing at best. Any advice out there? It's so pretty that I don't mind having it as a decorative plant in the garden, but it sure would be nice to avoid letting those pretty colors and vitamins go to waste...

5.05.2010

a lesson learned and herbiporn

Could it be? Two posts in two days? Incredible!

Today's post is short on words and long on photoz. I finished my second final paper this afternoon and rewarded myself with some gardening.

As you know, I'm running this garden on the cheap. As such, I cut corners wherever I can. So today, when I went to the local hardware store, I chose the cheap potting soil (we will call it Brand X) instead of Miracle Grow, which I usually get. I hauled 3 bags (60 lbs.0 of it home in my folding shopping cart and brought the bags, one by one, upstairs. Long story short, don't skimp on the potting soil.

Brand X (left) and Miracle Grow (right), after thorough waterings


Brand X essentially turned to sandy mud that wouldn't drain even when saturated. The deck is a muddy mess and I have resorted to leaving the soaked pot in the sun so it will (hopefully) dry out. Seriously, fork over the extra bucks for the good stuff. Because now I have 60 lbs. (400 when wet) of the bad stuff...

But! On to happier, more photogenic topics than mud:

By popular demand, may I introduce my trash pot:
This is where I throw organic matter trash while I'm on the deck (and sometimes I store my trowel in it). You know, old potting soil, thinned seedlings, husks from grilled corn on the cob, etc. A while back, one of my discarded lettuce thinnings took root. I didn't yank it because I figured if it was hearty enough to survive thinning and live in a trash pot, more power to it. It's thriving, there on the left.

In other news, my savage lettuce/chard container is about to explode


The flat lettuce planter has also been doing well since Sprocket has stopped trying to eat the baby lettuces


And now, my pride and joy, the zucchinis!
The shot on the left was taken at 11:38AM today, the shot on the right at 5:19PM. You may have to look at the larger versions (iPhone shots, apologies), but holy cow! All that in 5.5 hours?

It's gonna be a gooooood summer, y'all.

5.04.2010

sum sum summertime

It would appear as though summer has arrived in Philadelphia. Without a lot of warning if you ask me...

On the personal front, the last few weeks have been kind of insane. Besides being neck-deep in finals at the moment, I dislocate my left index finger in a bike crash a few weeks ago. Not a big deal in the scheme of things, but it has delayed some of my gardening projects because I'm currently not able to lug a flat of potting soil up to the deck. In any event, I am healing and the papers are (gimp-ily) getting written, so I thought I would take a break from my magnificent tome about 1950s religion to bring you up to date in el jardín.

The second round of eggplant and tomato seedlings are doing much better in their temporary pots. You may recall some poor judgment on my part last month when I tried to plant round one too early. The temporary pots go outside for (usually) the afternoon and come in at night. However, I imagine that the 80-degree weather we have been having will start to keep the nights warm enough for me to plant them soon.

A few days ago, I planted zucchini seeds. I am expecting great things from these little dudes, considering my abundant success with cucumbers last summer (cucumbers, zucchini, same thing. Psh). Hank and I eat a ton of zucchini, so I cannot wait to cook up some of my own pride and joy!

One issue I am beginning to realize may be a problem this summer: wind. Although the deck is protected on two sides by 10' walls, it nevertheless gets very windy. I want to look into making a trellis wind-screen with some sort of aggressive vine. Any recommendations? Flowering is nice, but not necessary, and it has to be container-friendly. Had I realized this earlier, I would have purchased pole beans, which would have fit the bill perfectly, but alas, I bought bush beans or their smaller stature. Anyway, this project is in its infancy, so any suggestions would be muchly appreciated!

That's all on the garden front. I'll be mostly done with school next week, and hopefully by then I will have more exciting things happening on the deck.

Until then, join me in my excitement over the return of good produce to my grocery store! And my CSA starts next week!
Om. Om nom nom.

Update: Upon inspection a few minutes ago, the zucchini have started to sprout! That was superfast. I guess they like torrential rain and hot weather...

4.17.2010

tomatoes smell like tomatoes

As everyone else probably expected, breaking the rules didn't go over so well, mostly because we have been having some chilly nights followed by only mildly warm days. The eggplants, heat-lovers they are, are not doing so well. They don't seem dead, they just don't seem very alive either. I have had to keep them under their milk cartons almost every night and they just look sad. I imagine I will have to replace them soon with my indoor eggplant reserve, which should probably be transplanted ASAP or they'll run out of root room. One of the tomatoes* I planted seems to be doing fine (the other was left unattended at the hands of a ruthless killer kitten mere days after I planted it...), although it isn't growing quite as fast as I'd like. Hopefully as the weather gets warmer, this will all straighten itself out.

*With the help of my dear father I figured out it is indeed a tomato plant. The conversation went a little like this:
Me: Dad, how do I know what I planted is a tomato plant and not purple coneflower?
Dad: Well, tomato plants have a very distinctive smell. Crush a leaf between your fingers and see how it smells.
Me: What do tomato leaves smell like?
Dad: [pause] Well, I guess they smell like tomato plants.
This hunch was later confirmed via an emailed photograph of the plant in question. But just in case you ever mix up your seedlings, the tomato plant is the one that smells like a tomato plant.

The lettuces are doing splendidly (they like cool, wet weather), so well that they are getting pretty crowded in their bucket. So I decided to make a second lettuce planter.
What's that you're saying? What an unconventional planter? Why yes, yes it is! Here's what I did:
Hat tip to Ms. Jess for helping me realize that the extra under-the-bed storage drawer that has had no place in my apartment for at least two moves now would make an excellent shallow planter! Worried that its translucent plastic would cook the roots of whatever I planted, I lined it with black garbage bag (cut one down the side seams and it fits perfectly) and pinned it with clothespins. Inside the garbage bag, I lined the bottom with about 1.5" of styrofoam peanuts. This helps with 1) drainage, or in this case, giving extra water a place to sit that won't water log the roots and 2) keeping the weight of the planter manageable. As an afterthought, I decided to drill a few holes in the very bottom corners of the bin and managed to catch the garbage bag on the drill bit with almost every hole. So, the garbage bags have some holes, but now so does the bin. Breathe, dirt. Breathe! It's not the prettiest solution, but it is doing its job. I planted mesclun mix leaf lettuce around its perimeter and they are sprouting already.

Warning: when using a shallow container, be sure that you are raising plants that are shallow-rooted. 6" is not a lot of dirt! These drawers would make a decent seedling bed that you could transfer plants out of later.

Lastly, I did a little deck clean-up and reorganization today. When we moved into this apartment, we inherited, among other things, a weird wood table/shelving thing that has been sitting on our front balcony doing absolutely nothing. Today I moved it out back to hopefully change up the planter levels (prior to this everything was sitting on the ground looking rather un-landscaped).
From left to right, top: oregano, catnip, chives, pretty flowers; bottom: more flowers, sad eggplants, lonely tomato, big bucket of dirt, lettuces
It looks much nicer now, really. And it will look even better when things warm up more.

4.07.2010

breaking the rules

We've had some anomalous weather for the past few days. Today it reached 90 degrees (according to weatherunderground, at least). Yes, that's right. April 7th. 90 degrees. Bizarro. It is supposed to cool down over the weekend, but for now, it is boiling in my apartment, and I got it into my head earlier that things needed to be done in the garden!

My eggplant and purple coneflowers have gotten very big, and if the roots poking out of their peat pods are any indication, it is time to plant them. So the weather is warm, my seedlings are ready, I put soil in more containers over the weekend... sounds like a perfect planting afternoon! WRONG.

According to McGee and Stuckey (and yes, I have a total gardener crush on them), and just about every other seedling instruction resource out there, you have to "harden off" your seedlings. This basically means that you are supposed to take the seedlings outside for a few more hours each day, building up until the seedlings won't get shocked by the temperature change. This can take up to a week.

Psh.

Like I have the patience for that.

M&S, I love you guys, but I don't want to wait a whole week. Besides, I have time to do this now. I'm sure they will be fine.

By way of insurance, I planted two of each and will keep the other seedlings in their trays indoors, and see how things go out on the deck.

Despite the heat, it was very windy today in Philadelphia, so I also made some protective covers for protection. After realizing I planted the eggplants too close together to fit under one half of a milk jug, I exercised some extreme resourcefulness. Gladware! So as long as it doesn't frost sometime in the next few days, they should survive. If not, I always have extras!


--------------------

In other news, the weed-flowers are thriving. They seem to really enjoy the heat, and both are flowering. The pansies, on the other hand, aren't huge fans of lots of sun and this much heat, so they are not doing so well. Ah, well. I knew I'd have to replace them eventually.


Finally, the lettuces are doing very well. So well, in fact, that I have had to do some aggressive thinning. In light of my reluctance to let any seedlings go to waste, I am going to eat the thinnings. Thus, I present to you my very first salad:

Yes, that is a real fork. Yes, eating this is going to be more work than it's worth (in fact, washing the stupid things was already more work than it is worth, but...). Just think of it as a micro-micro greens salad.


3.31.2010

trimmings

Today I had to do one of the things I hate most about raising plants from seeds: thinning.

Once your seedlings get going, it is important to thin them to make sure the little dudes have enough room to grow strong enough to handle the transplant outside. This is especially important if you, like me, planted 2-3 more seeds per peat disc than is recommended or necessary. I think that this behavior stems (badum-bum) from my irrational fear that I won't be able to nurture a plant from seed to fruit. In all honesty, raising seedlings isn't that hard, but I remain shocked every time I manage to make it happen. Yet every time I try to hedge my bets by planting a few (read: many) extra seeds here and there.

However, by planting more seeds, I invariably produce more seedlings than I can handle/raise, necessitating the thinning (which, as I mentioned, I hate). It's a vicious cycle, really, and it breaks my heart to kill any of the plants...

That others might live...

My eggplants have been moving right along. Many of the seedlings are just starting to get their first true leaves, which are the second set of leaves that appear. In reality, the first leaves you see on a seedling aren't leaves at all. They're actually called cotyledons, or seed coats, which essentially come from the seed's original casing. I read somewhere (I can't remember where; bad historian!) that cotyledons are actually food storage for the plant until it starts photosynthesizing. But I digress. A few of my eggplants now have their first "true leaves," which means that they're almost ready to be transplanted.

So thin them, I did. I picked the strongest/most developed seedling in each of my discs to let grow, and chopped the rest. McGee and Stuckey recommend using manicure scissors to cut the discarded seedlings off at the base, as trying to rip the seedlings out may damage the root structure of the seedlings you are saving. As I had no manicure scissors, I used my pruning shears, which was a lot like cutting butter with a machete. Whatever.

We are supposed to have some very nice weather this weekend, and I am tempted to transplant some eggplants outside, but I should really wait until our frost date. This springish weather is deceiving...

3.25.2010

Week 1

I am calling this "Week 1" mostly because it is the first week I have had things planted outside.

Just a few quick updates in seedling land.

First off, things are starting to look less dead outside. I planted some pansies alongside the (probable) weeds and in a hanging basket trio I got from Ikea and never used last season:


The lettuces are coming along nicely, as well:


In case you missed it, look! Little lettuces!


Lastly, I am uber-impressed with the indoor seeds I planted last weekend. To be honest, I can't remember which half of the tray is tomatoes and which is purple coneflower, but somebody is on the move!

I suspect that it is the coneflower, but who knows? I am excited to see things growing in that tray already!

Last night, Hank and I took a trip to Lowes to get project supplies and garden stuffs. I am going to put up a clothesline outside and needed to get hardware for that, and I needed soil and a new pair of gardening gloves (winter ate one of my old pair). In addition, I bought another 17" plastic pot and a packet of bush bean seeds. I didn't set out to purchase more seeds, I just couldn't resist! Those won't get planted for another month or so.

Finally, we got our worm box! More details to come, I swear! Hank promised to write a guest blog about it, we just need to gather the rest of the supplies.

3.20.2010

more planting

Well. Spring has definitely sprung in Philly. It has been a glorious 70 degrees here for the past few days, serving as a reminder to get my act in gear with the garden.

I'm running a week or so late on my original schedule. It's somewhat intentional, as I wanted to make sure that I wasn't pushing the frost date too much, but lately time has been getting away from me, too. The end of the semester is fast approaching, and this coming week will be especially hellish. So, because I had an extra few hours today, I got cracking on the next few steps.

Today I started my cherry tomatoes and echinacea in my 2nd greenhouse (no photos for now. Trust me, they look exactly the same as the others did when I got them started), and planted my lettuces, chard, and chives outside.

In order to save myself from Zipcar-ing to the (unbearably crowded) Home Depot today, I decided to re-use my potting soil from last year. I have no idea if that is totally kosher in container-gardening world, but oh well. Thembi thinks it's cool, McGee and Stuckey don't expressly forbid it, and I really hate Home Depot on Saturdays. So, I dumped all the soil out, sifted through for the bigger roots, re-fertilized, watered, and back into the containers it went.

I hate to say it, but I am hoping that it cools down a bit in the next few days. Chard and lettuce are supposed to germinate in slightly cooler weather, and it's, uh, 73 degrees right now. In any event, I have the planted containers in the shade to keep them cooler for now.

In other news, I found this while cleaning up the old/dead plants last week:

Green growth! That somehow survived three feet of snow! Anyone know what they are? The one in the back looks like it may be a plain old thistle or something, but the one in the middle is odd. It has soft furry leaves and no smell. Both might very well be weeds, but I am so excited to have green in the garden, that I'm going to just leave them there for now.

3.15.2010

sprouts!

I have sprouts!

I returned from California to find a tiny little eggplant plant started, proof that Hank did his job while I was away. Now there are three plants started, and I am having a good time checking on their progress.


I will be starting the echinacea and the tomatoes in a week or two, and a few of my outdoor-starting plants can go out toward the end of this month. That means I need to start preparing the containers and soil, something I haven't yet put much thought into. A project for this weekend, perhaps.

Not much else to report here, other than that the drifts of snow have turned to buckets of rain. Hopefully we will get some nice weather soon!

3.05.2010

it begins!

It's early March. You know what that means! I finally get to plant things!

I decided to back everything up one week toward the safe side of the frost-date spectrum. We have been having some wacky weather lately, and I don't want to risk frost-bitten seedlings in April. Therefore, I got the eggplants started this afternoon.
It went a little something like this:
First, I assembled my supplies:

1 12-pack Jiffy greenhouse (because I'm only planting eggplants on this go-round, I reserved four peat pellets for later use)
1 3/4 c. warm water
1 pack seeds of your choice (mine are Black Beauty heirloom eggplants)


The directions that come with the greenhouse are super-simple. Those little discs are dehydrated peat moss surrounded by a very thin netting.

1. Add water. When you add water to the tray, they blow up kind of like grow sponge pills (please tell me I wasn't the only one who had those).
2. After three or four minutes, the discs are about 1.5 in. tall and ready to be planted.
3. Rip the netting back from the top of the disc, and muss up the peat a little bit.
4. Place your seeds (3-4 per disc). Don't worry too much about where they fall. The peat is uber-fertile and you'll find that seedlings will sprout up every which direction.
5. Cover the seeds back up with peat, and voilà! You are done.

The whole process takes less than 10 minutes. I usually save my extra seeds in a ziplock as insurance, but that's just me being a little crazy. I have had very good success rates with the Jiffy discs, so don't worry about saving every seed


The seeds in their cozy new home:

I also set up Kitten Defense: Version 1.0. It's low-tech, but I have to start somewhere.
As eager as I am to start watching these suckers grow, I am leaving Hank in charge of the seeds while I go home to California for my spring break. He has promised to keep an eye on them, and I have charged him with the responsibility of taking daily photographs if they start sprouting. As I recall, the eggplant seeds took a long time to sprout last year, so fingers crossed, I won't miss anything.

Hooray, spring!

(Apologies for the ridiculous formatting and general lack of excitement in this post. I'm working off an unwelcome head cold, and it's also way past my bedtime, which happens to be 11PM on Fridays. I'll be back in a week, and maybe I'll be able to get Hank to do a guest blog on WORM BOXES! Oooh, aaah)

2.26.2010

CSAs

As Philadelphia emerges from yet another snowstorm, I once again (constantly?) find myself looking forward to springtime. Had there not been snow on the ground or five pairs of slushy shoes by the front door, the three hours of bright sunlight we had this afternoon would have fooled me into walking outside without a jacket. Or in sandals. Or with sunscreen on. Instead, the windchill was still 25 degrees, so I took a nap.

In any event, this afternoon I remembered to do some research on Philadelphia-area community-supported agriculture (CSA). A CSA is basically a crop share organization in which people who aren't farmers (unfortunately, me), pay a seasonal or yearly fee to help support small, independent, local farms. In return, you receive a box of fresh, in-season fruits and veggies every week, available for pickup at a local distribution point.

Back in Boston, I envied my avid CSA-er friends and their fully-stocked refrigerators, but my living situation (one person probably has a hard time eating, say, 3 heads of lettuce in a week) and transient college lifestyle kept me from joining up. I also investigated joining one in DC, but I could never reconcile the cost with the inconvenience of the pickup points (hello? People live in NE, too!).

However, things are looking up in Philadelphia this year. Philly has an impressive number of CSA farms; some of the better-looking ones I found here. I live in much closer proximity to (multiple) pickup points. Best of all, I live with Hank (read: another mouth to feed), who is generally supportive of my cooking experiments. Furthermore, we could both use more produce in our lives.

So I did some research this afternoon and settled on this one: Lancaster Farm Fresh Cooperative is an organization of small-scale farmers in Lancaster County, many of whom are Amish or Mennonite. I am going to go for the half-share, which at most places feeds 2-3 people, along with a fruit share. I was hoping to find one that combined fruits and veggies into one share, but oh well. The best part, I mean, other than getting a great selection of produce for less than $20 a week, is that my local pickup point is at Metropolitan Bakery, one of my favorite local foodplaces. (Mmm, bread. Mmm, cheese).

You may be asking, "why, with all of the wonderful vegetables you plan to grow on your own, do you want to buy even more??" Well, let's be honest here. Container gardens don't grow all that much. And when they do, you have 3,000 cucumbers in the span of two weeks. Furthermore, because many CSAs come from multiple farms (I think LFFC has over 50), the variety of produce is incredible. I'm crossing my fingers for some watermelon this year! Om nom nom.

Last but not least, here is my obligatory spiel on buying local. Although locavorism (it's a real term, I promise) has its benefits, it is not without controversy. This article sums it up pretty well: no commercial food production enterprise, no matter how small or how local, is ecologically or nutritionally perfect. However, there are certainly steps one can take toward the elusive goal of carbon neutrality. For me, however, the idea of buying local appeals more to my desire to support small farmers. Perhaps I've read too much Michael Pollan, but the idea of big business agriculture troubles me enormously. In short, I believe that maintaining diversity in agriculture is crucial for a healthy economy, a healthy environment, and a healthy populace. So, I will do what I can do. And eat yummy foods while I'm at it.

2.15.2010

waiting

Hello, world.

Not much is new in the way of the gardening project, but the end of February is rapidly approaching. I think I'll wait until after March 1 to get the little guys going, just to be on the safe side of the frost, considering my 'hood has been looking like this lately:


Truth be told, I haven't actually seen any of my deck, the various planters, and remnants of last summer's projects in quite a while. I'm assuming they're still there. Just buried under three feet of snow.

In lieu of anything exciting going on garden-wise, I have been keeping busy experimenting in the kitchen. I'm working on incorporating more produce into the meals I make (rather than just the veritable whole-fruit basket I bring with me to campus for lunch). Last night I made a decent mushroom-based stew, and carrots have recently made a reappearance in my life. Obvious, I know, but I'm the kind of person who will pair broccoli with just about any meal just to get some greenery in there. But veggie variety is good!

That's all for now. Check back in a few weeks for the seedling start play-by-play.

2.02.2010

updates

Predictably, graduate school took over my life already. Fortunately, there haven't been any huge developments on the garden front. However, in the spirit of, well, having something to write about while I'm waiting for Hank to finish dinner, here is what is new:

1. I finally received my mini-greenhouse trays. Ultimately, I settled on two smaller trays rather than the behemoth tray mostly because only a few of my plants will start indoors.

2. I recently received a care package from my parents that included (among other things) a few more books (Park's Success With Seeds, Park's Success With Herbs, and Secrets of Plant Propagation). Until I get a chance to read about something other than 20th-century urban history, I won't have a lot to say about them. However, upon a quick flip-through, they all seem like informative resources, despite the fact that the links to the two Park books are likely the least informative links I will ever post on this blog. Thanks for the books, Dad. Mom, thanks for the warm winter socks.

3. I also received catalogs from both Burpee and Territorial last week. So now I can not only gawk at their prices, but also drool over things I'm not actually going to grow this year. So there's that.

And now, back to grading undergraduate reflection on globalization. Is it summer yet?

1.24.2010

decisions

Now that I have my seeds, the next step is getting seedling supplies. This brings me to a couple of things I need to figure out.
To risk the frost, or not risk the frost?
Frost dates are calculated by an area's last average frost. I am tempted to push all of these dates a week or so earlier in the hopes that it will warm up early this year. Last year, I know I started my seeds indoors ahead of schedule, and likewise planted them outside ahead of schedule, I just don't remember how early. As far as I remember, that worked out just fine.
The obvious con to this plan is tempting fate a little too much with fragile seedlings. Seedlings need light and their roots need warmth when they go outside, and nighttime low temperatures can really sting in the early spring. The pros to this are a longer growing season and a (slight) remedy for my winter restlessness.

One nice thing about containers is their movability. Theoretically, I would know about a cold snap with enough warning to bring the containers inside for a few days. However, the movability of containers is tempered by how much a container full of watered soil weighs. Furthermore, keeping the plants indoors also assumes I can keep the cats away from them, which will be interesting.
Something to think about; advice is totally welcome.

Moving right along to decision #2:

How many mini-greenhouses do I want to buy?For the uninitiated, mini-greenhouses are essentially plastic trays with lids that house disks of peat growing material. This is the easiest way to raise seedlings (in my highly tested comparison of peat disks to, say, dixie cups with potting soil), and in my opinion, it is totally worth the extra cost to buy the materials. Further, you can purchase additional disks and the trays are reusable, though I wish they were sturdier. Anyway, these greenhouses, usually made by a company called Jiffy, come in all shapes and sizes. My growing shelf will accommodate a big hummer that holds 72 disks that I can get for $12.99 with shipping from amazon.com. However, I'm not sure I need so much space. For the same price, I can get two 12-disk trays. I think I am leaning toward the 72-disk tray, not because I need all that space, but because it may give me some flexibility in positioning the disks in the interest of their lamp.

The other issue is cost: I may be able to find either/both of these items for cheaper at the Home Despot. However, when I made a trip over there a few weeks ago, their garden center was still in winter mode. When I called today, I got hung up on twice being transferred from department to department, so I don't know if they have greenhouses in stock or how much they cost. Anyone have an idea on the price of these bad boys outside of Internetland?

seeds ii

My seeds finally came in the mail! The crisp paper packets are tidy and promising, and when laid out on my desk, I am tempted to take our flirting-with-50-degree weather and run with it. However, in the interest of avoiding a seedling massacre, I will continue to plan rather than do.

So far, I have set up a tentative planting schedule. Many of the things I am growing this season can be direct-sowed (sown?) outside when it warms up, rather than starting everything indoors (like last year). Philadelphia's approximate last frost date is mid- to late-April, which I am going to call April 17, because it's a Saturday, and I know I have time to work on the deck on Saturdays.

The indoors-starts:
Eggplant - late February/early March
Tomatoes - early March
Echinacea - early March

The indoor- or outdoor- starts:
Chives - early March indoors, late March outdoors
Mint - early March indoors, after frost date outdoors

The outdoor-starts:
Lettuce - mid-March
Mesclun lettuce - mid-March
Chard - late March
Bee Balm - early April
Delphinium - after frost date
Basil - late April
Squash - Early May

As I look at this, I realize all these dates are a long, painful way off...

1.21.2010

books

It's high time I tell you about all the container research I've been doing.

For Christmas I asked my family for some books on container gardening. My parents, avid gardeners for as long as I can remember, came through with some books from their personal collection (pardon amazon's wonderful cover images):

The first, Small & Container Gardening, is more a coffee table book (3 lbs and hardcover) than anything, with lovely photographs that are great for design and planning ideas. The book is divided roughly in half between small garden gardening and container gardening. The big plus on this book is its flower container designs. I'm not doing many flowers this year, but I do plan on having a prairie-themed pot with various grasses and flowers. I remember having purple coneflower, etc. in the garden when I was a kid, and many of the flowers I will have are bee and butterfly attractors, which can't hurt in a city with fewer pollinators.

The second, Gardening in Containers from Ortho Books, is a much lighter-weight reference that's heavier on actual logistics. Lots of good stuff here about fertilizing, watering, soils, and general care. Also, because it is aimed specifically at containers, it addresses a number of the different issues unique to location (rooftop and wind, balcony and light access, decks and heat). It also has a great section toward the end with brief descriptions of various plants with information about hardiness, size, etc. However, like the first book, this one spends a good chunk of time talking about garden design. All things considered, I don't mind the design sections, especially when they are paired with really good nitty gritty info.


The last of the three, Sunset's Container Gardening, is largely a pared-down rehash of the previous two books. Not much new here (how many times can the authors of these books recommend using an old boot as a whimsical planter?), and a lot less text. The book displays really stunning photographs of gardens, that unfortunately, will probably bear little resemblance to my deck. I am much more concerned with a productive, healthy garden than with color complements and echo effects. This book isn't bad, it just felt like a lot of the same information presented in a not-that-different format.

Together, these three books got me thinking and planning, but their authors have a different aim than I have for my garden. I probably will not spend a lot of time swapping out decorative plants through the spring, summer, and fall. Although I hadn't really considered planting more than one plant in each container (and I may end up doing one or two that way), I am not too concerned with looks. These books' emphasis on flowers and visual appeal comes at the expense of attention to edibles. The most I get is a few pages on the wonders of kitchen herb gardens and a bit about fruit trees, but very little is mentioned about other fruits and vegetables. So, I asked the internet.

Users on amazon.com came through for me again, recommending McGee & Stuckey's Bountiful Container. Despite it's cheesy-sounding title, this book is a goldmine of information about container edibles; I can't say enough good things about it. No photos here, just a number of illustrations, and a whole lot of text. The book is about a third planning, care, and maintenance, and the rest is a vegetable-by-vegetable (and fruit, herb, and edible flower) reference.

The logistical stuff covers everything you need to know as a
newbie, including things not covered in the other books: necessary tools, realistic planning and expectations, detailed soil composition information, DIY and inexpensive containers (with no mention of the stupid boot)... everything. The meat of the book, the reference section, covers almost every edible you could conceivably grow in a container, with a proper dose of sass: "You know you can't grow a full-size jack-o'-lantern in your containers; don't even try," but they will also tell you about miniature and dwarf varieties that will thrive in containers. Most importantly, the reference section gives really valuable information about required depth (probably the biggest issue I've had with containers), and points you toward varieties that are easy to care for, and productive, in pots. The authors of the book certainly are concerned about visual appeal, but their information is well-suited to my gardening philosophy: use whatever ugly containers you can find for free, and hope that you get some good food out of the whole thing.

1.18.2010

homemade light bed

One of this year's garden challenges will be how to grow the seedlings themselves. Last year, I had a warm, sunny window to set up a mini-greenhouse (akin to this) away from the reach of my curious kittens. In the new apartment, I have no such luck. Sure, I have sunny windows, but they are very not-warm, and all of them are very cat-accessible. So, I looked into how to set up an artificial light bed, and realized that, with a few modifications, my kitchen cart would work well. Taking advantage of the very un-January-like weather today, I did a little installation. Here's how you do it:

Supplies:
- Some sort of cart (I imagine just about any type of shelving would work)
- Ruler or tape measure
- Under cabinet light fixture (I got this one for $9.95 with bulb)
- Power drill
- Screwdriver
- A plan


Step 1: Get a kitchen cart. Step 1.5: Get the cart out to your deck. Step 1.7: Get your cat to help


Step 2: Assemble your supplies.
Note: Isometric schematics help, but only if you are an ex-architecture student looking to relive glory days.


Step 3: Turn cart upside-down
Step 4: Measure
Step 5: Drill, install

Step 6: Plug in; grow things!

I like to think of myself as a lot more handy with things like this than I actually may be. In that vein, a few other pointers: do not underestimate your ability to drop a screw into the irretrievable abyss under your deck. Twice. Also, drill bits are hot. I knew that. Above all, make sure that when you buy your fixture, that it is long enough to span between whatever your installation points are. Despite my careful isometrics, I failed to keep that last rule in mind. If you look at that third picture, you'll notice that I cut it pretty damn close. Oh well, it's stable. Whatever.

My big concern right now is whether the single fixture will produce enough light or if I need a second fixture. I plan on using Jiffy trays again this year, and elevating them up closer to the bulb with books or something at first, and then lowering them as the seedlings grow. I am also considering papering the area around the fixture with aluminum foil to increase reflectivity. Anyone have any advice on lumens to seedling ratios?

Perks of this project: Assuming you already have a shelf to spare (on a bookcase, in a well-ventilated closet, etc.), the entire cost of the project was the fixture itself. Granted, the Home Depot sells under-cabinet fixtures from $10-$200 depending on the type of light, but I am operating under the assumption that my plants won't prefer LED over fluorescent tubes. Likewise, the cart-light doesn't take up any additional space in my 1-bedroom apartment, minus a few canned goods that will be displaced for a few months.

The only unresolved issue is how to keep the cats out. I suppose I could always fashion some rudimentary removable walls out of cardboard boxes. And for all their stupidity, both cats respond very well to the spray bottle... an issue for another time! My seeds still haven't arrived, and I haven't been able to find Jiffy planters in stores yet. Don't they know it's time?!?

1.16.2010

seeds

I ordered seeds from TinySeeds a few days ago. Tiny Seeds carries primarily Botanical Interests seeds, which I have seen just about everywhere from national chain hardware stores to independent nurseries. Their selection is pretty good, and their prices are much more reasonable than other more well-known seed catalogs (hat tip, Thembi).

Like last year, I plan to raise most of my garden from seed. This year, however, I plan on planting more flowers, many of which will be easier to buy as transplants later on. The seed list, which may expand later, is as follows:

Herbs:
Basil - Genovese (Organic)
Chives - Common
Spearmint

Vegetables:
Eggplant - Black Beauty (Organic)
Zucchini - Black Beauty
Cherry Tomatoes - Sugar Sweetie (Organic)
Lettuce - Crisphead Great Lakes
Lettuce - Mesclun Baby Greens mix (Organic)
Swiss Chard - Bright Lights

Flowers:
Delphinium - Butterfly Blend
Bee Balm - Dotted Mint
Purple Coneflower (Echinacea)


The seeds should get here in a few weeks. A number of these guys should be planted outside a few weeks before the last frost date, minimizing the amount of space I have to devote to raising seedlings indoors.

A brief word on organic gardens: I am not a staunch organic-ist. At the supermarket, I will buy organic if the cost and quality are similar. When it comes down to it, though, I would much rather put the time and extra expense into purchasing locally when it is an option. I much prefer the idea of keeping local farmers viable by purchasing produce in season at local farmers' markets, when I can.

I hold the same sort of logic when it comes to raising my own vegetables: I will raise my garden organically when possible, and as sustainably as possible. However, I don't think that organic is an all-or-nothing proposition: I do what I can on the budget I have. Container gardens are notoriously starved for nutrients, and balanced organic fertilizers are expensive and hard to come by. However, homemade, effective options exist for pest control, and I will utilize them whenever possible.

In the end, my herbs and vegetables will not be certified organic. They will, however, be as healthful as is possible. And, as a side benefit, how much more local can you get than just outside your bedroom door?

1.14.2010

january cabin fever

It is January in Philadelphia. It is cold. It is frequently dark.

It's time to start thinking about the garden.

Last summer marked my first true foray into gardening. While spending a year off before graduate school working in a mind-numbing retail job, I realized I lacked a certain sense of productiveness in my life. So I started a garden on the back steps of my apartment (left). Perhaps as much a way to make peace with the miserable Washington DC summer weather ("Gross: it's 95% humidity! Well, at least my vegetables are happy...") as a constructive hobby, my back-steps garden certainly gave me something to look forward to after work each day. My daily beeline to through the apartment and to the back steps to check on the plants sometimes trumped a substantial greeting to my boyfriend, Hank, but he (graciously) rarely mentioned it. Most of all, it gave me an opportunity to cool down from my bikeride home, take a few decompressing breaths to end the workday, and to assess what kind of fun botanical developments had happened that day.

I grew an assortment of vegetables and herbs last summer: eggplant, cucumbers, bush beans, and some pretty weird bell peppers, as well as basil, oregano, and catnip, and an ill-fated dwarf sunflower plant. With the exception of the catnip and a gifted bell pepper seedling, I grew everything from seed. I also grew everything in containers, because I had little access to a real yard. Overall, it was a learning experience. Some veggies were more prolific than others, some far more substantial than others, but no matter what, a baseball-sized eggplant grown from your own garden is way more exciting to eat than any purchased produce.

Last August, Hank and I have relocated to Philadelphia so I could begin my graduate studies at Temple University. The new apartment has a 10'x10' deck on the third floor with some solid afternoon sun. I will, of course, have to use containers again, but my workspace is much larger. The real challenge this year will be finding time to keep the garden going while up to my neck in PhD coursework. However, I trust that the garden will provide the same kind of fulfilling diversion as it has in the past.

In addition to the the pleasure of the harvest, I found that gardening complemented my other hobbies: photography and cooking. This year, I would like to add a fourth to that mix: writing. Last year's project was largely trial and error, guided by some much-needed advice from the more veteran veggers in my life, my parents and my then-next door neighbor. This year, with a bit of experience under my belt, I at least have some semblance of a plan. The last month of winter break has given me time to research, as well.

My hope is that this blog can serve not only as a narrative of my own experiences eking out crops (can I call them that?) from my concrete jungle of a city block, but also as a record for myself: what worked, what didn't, etc. Likewise, I am on a meager graduate student budget, so finding creative, inexpensive solutions for city gardening is something I hope others may find valuable. Or at least humorous: you may have noticed I recycle cat litter buckets as planters. There will be more of this. Also stay tuned for how I plan on getting many large bags of potting soil from the Home Depot to my third-floor apartment without a car or elevator, but hopefully not without Boyfriend, Lifter of Heavy Things.

Garden planning begins long before the end of winter is in sight, a thankful thing for people like me, who are more than ready for longer days and warmer weather. Philadelphia's last frost date is sometime in mid-April, but I plan on starting my seedlings indoors in the next few weeks. Next on the docket: building my own seedling nursery.