Showing posts with label seedlings. Show all posts

4.07.2010

breaking the rules

We've had some anomalous weather for the past few days. Today it reached 90 degrees (according to weatherunderground, at least). Yes, that's right. April 7th. 90 degrees. Bizarro. It is supposed to cool down over the weekend, but for now, it is boiling in my apartment, and I got it into my head earlier that things needed to be done in the garden!

My eggplant and purple coneflowers have gotten very big, and if the roots poking out of their peat pods are any indication, it is time to plant them. So the weather is warm, my seedlings are ready, I put soil in more containers over the weekend... sounds like a perfect planting afternoon! WRONG.

According to McGee and Stuckey (and yes, I have a total gardener crush on them), and just about every other seedling instruction resource out there, you have to "harden off" your seedlings. This basically means that you are supposed to take the seedlings outside for a few more hours each day, building up until the seedlings won't get shocked by the temperature change. This can take up to a week.

Psh.

Like I have the patience for that.

M&S, I love you guys, but I don't want to wait a whole week. Besides, I have time to do this now. I'm sure they will be fine.

By way of insurance, I planted two of each and will keep the other seedlings in their trays indoors, and see how things go out on the deck.

Despite the heat, it was very windy today in Philadelphia, so I also made some protective covers for protection. After realizing I planted the eggplants too close together to fit under one half of a milk jug, I exercised some extreme resourcefulness. Gladware! So as long as it doesn't frost sometime in the next few days, they should survive. If not, I always have extras!


--------------------

In other news, the weed-flowers are thriving. They seem to really enjoy the heat, and both are flowering. The pansies, on the other hand, aren't huge fans of lots of sun and this much heat, so they are not doing so well. Ah, well. I knew I'd have to replace them eventually.


Finally, the lettuces are doing very well. So well, in fact, that I have had to do some aggressive thinning. In light of my reluctance to let any seedlings go to waste, I am going to eat the thinnings. Thus, I present to you my very first salad:

Yes, that is a real fork. Yes, eating this is going to be more work than it's worth (in fact, washing the stupid things was already more work than it is worth, but...). Just think of it as a micro-micro greens salad.


2.02.2010

updates

Predictably, graduate school took over my life already. Fortunately, there haven't been any huge developments on the garden front. However, in the spirit of, well, having something to write about while I'm waiting for Hank to finish dinner, here is what is new:

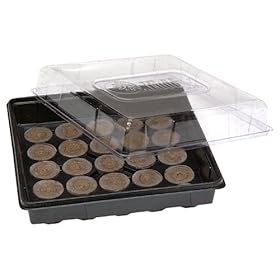
1. I finally received my mini-greenhouse trays. Ultimately, I settled on two smaller trays rather than the behemoth tray mostly because only a few of my plants will start indoors.

2. I recently received a care package from my parents that included (among other things) a few more books (Park's Success With Seeds, Park's Success With Herbs, and Secrets of Plant Propagation). Until I get a chance to read about something other than 20th-century urban history, I won't have a lot to say about them. However, upon a quick flip-through, they all seem like informative resources, despite the fact that the links to the two Park books are likely the least informative links I will ever post on this blog. Thanks for the books, Dad. Mom, thanks for the warm winter socks.

3. I also received catalogs from both Burpee and Territorial last week. So now I can not only gawk at their prices, but also drool over things I'm not actually going to grow this year. So there's that.

And now, back to grading undergraduate reflection on globalization. Is it summer yet?

1.24.2010

decisions

Now that I have my seeds, the next step is getting seedling supplies. This brings me to a couple of things I need to figure out.
To risk the frost, or not risk the frost?
Frost dates are calculated by an area's last average frost. I am tempted to push all of these dates a week or so earlier in the hopes that it will warm up early this year. Last year, I know I started my seeds indoors ahead of schedule, and likewise planted them outside ahead of schedule, I just don't remember how early. As far as I remember, that worked out just fine.
The obvious con to this plan is tempting fate a little too much with fragile seedlings. Seedlings need light and their roots need warmth when they go outside, and nighttime low temperatures can really sting in the early spring. The pros to this are a longer growing season and a (slight) remedy for my winter restlessness.

One nice thing about containers is their movability. Theoretically, I would know about a cold snap with enough warning to bring the containers inside for a few days. However, the movability of containers is tempered by how much a container full of watered soil weighs. Furthermore, keeping the plants indoors also assumes I can keep the cats away from them, which will be interesting.
Something to think about; advice is totally welcome.

Moving right along to decision #2:

How many mini-greenhouses do I want to buy?For the uninitiated, mini-greenhouses are essentially plastic trays with lids that house disks of peat growing material. This is the easiest way to raise seedlings (in my highly tested comparison of peat disks to, say, dixie cups with potting soil), and in my opinion, it is totally worth the extra cost to buy the materials. Further, you can purchase additional disks and the trays are reusable, though I wish they were sturdier. Anyway, these greenhouses, usually made by a company called Jiffy, come in all shapes and sizes. My growing shelf will accommodate a big hummer that holds 72 disks that I can get for $12.99 with shipping from amazon.com. However, I'm not sure I need so much space. For the same price, I can get two 12-disk trays. I think I am leaning toward the 72-disk tray, not because I need all that space, but because it may give me some flexibility in positioning the disks in the interest of their lamp.

The other issue is cost: I may be able to find either/both of these items for cheaper at the Home Despot. However, when I made a trip over there a few weeks ago, their garden center was still in winter mode. When I called today, I got hung up on twice being transferred from department to department, so I don't know if they have greenhouses in stock or how much they cost. Anyone have an idea on the price of these bad boys outside of Internetland?

1.18.2010

homemade light bed

One of this year's garden challenges will be how to grow the seedlings themselves. Last year, I had a warm, sunny window to set up a mini-greenhouse (akin to this) away from the reach of my curious kittens. In the new apartment, I have no such luck. Sure, I have sunny windows, but they are very not-warm, and all of them are very cat-accessible. So, I looked into how to set up an artificial light bed, and realized that, with a few modifications, my kitchen cart would work well. Taking advantage of the very un-January-like weather today, I did a little installation. Here's how you do it:

Supplies:
- Some sort of cart (I imagine just about any type of shelving would work)
- Ruler or tape measure
- Under cabinet light fixture (I got this one for $9.95 with bulb)
- Power drill
- Screwdriver
- A plan


Step 1: Get a kitchen cart. Step 1.5: Get the cart out to your deck. Step 1.7: Get your cat to help


Step 2: Assemble your supplies.
Note: Isometric schematics help, but only if you are an ex-architecture student looking to relive glory days.


Step 3: Turn cart upside-down
Step 4: Measure
Step 5: Drill, install

Step 6: Plug in; grow things!

I like to think of myself as a lot more handy with things like this than I actually may be. In that vein, a few other pointers: do not underestimate your ability to drop a screw into the irretrievable abyss under your deck. Twice. Also, drill bits are hot. I knew that. Above all, make sure that when you buy your fixture, that it is long enough to span between whatever your installation points are. Despite my careful isometrics, I failed to keep that last rule in mind. If you look at that third picture, you'll notice that I cut it pretty damn close. Oh well, it's stable. Whatever.

My big concern right now is whether the single fixture will produce enough light or if I need a second fixture. I plan on using Jiffy trays again this year, and elevating them up closer to the bulb with books or something at first, and then lowering them as the seedlings grow. I am also considering papering the area around the fixture with aluminum foil to increase reflectivity. Anyone have any advice on lumens to seedling ratios?

Perks of this project: Assuming you already have a shelf to spare (on a bookcase, in a well-ventilated closet, etc.), the entire cost of the project was the fixture itself. Granted, the Home Depot sells under-cabinet fixtures from $10-$200 depending on the type of light, but I am operating under the assumption that my plants won't prefer LED over fluorescent tubes. Likewise, the cart-light doesn't take up any additional space in my 1-bedroom apartment, minus a few canned goods that will be displaced for a few months.

The only unresolved issue is how to keep the cats out. I suppose I could always fashion some rudimentary removable walls out of cardboard boxes. And for all their stupidity, both cats respond very well to the spray bottle... an issue for another time! My seeds still haven't arrived, and I haven't been able to find Jiffy planters in stores yet. Don't they know it's time?!?